środa, 29 lipca 2015

Francuskie róże / French Roses

Na mój dzisiejszy post dla Craft4You przygotowałam kolejną inspirację z kolekcji Sweet Paris od Dovecraft - tym razem to romantyczny notes shabby chic:
In my today's post for Craft4You I shared another inspiration I created using Dovecraft's Sweet Paris collection - this time it's a romantic shabby chic notepad:


Papiery ułożyłam warstwowo, na sprężynie zawiązałam koronkę, guziczek i misterne serduszko:
I layered some papers and tied a piece of cotton lace, a button and a filigree heart charm on the wire:


W misternie wyciskanej ramce (wykrojnik również z tej kolekcji) umieściłam czarno-biały obrazek róż, pochodzący z zestawu ATC Primy z kolekcji Stationer's Desk:
I placed a b&w roses image from Prima's ATC set from the Stationer's Desk collection in a intricately cut and embossed frame (the die also comes from the SP collection):


Narożniki jak zwykle wzmocniłam okuwkami:
As usually, I secured the corners with metal protectors:


Ozdobny jest również tył...
The back cover...


...i wnętrze notesu:
...and the inner covers are also decorated:


Dostępne w sklepie materiały są podlinkowane na blogu. 
Miłego dnia :-)
Elements available at the store are linked on the C4Y blog.
Have a nice day :-)

poniedziałek, 27 lipca 2015

Letni komplet urodzinowy / Summer Girl Birthday Set

Na mój dzisiejszy post dla Maja Design przygotowałam urodzinowy komplet dla młodej damy z najnowszej kolekcji Summer Crush:
For my today's post for Maja Design I made this birthday set for a young lady, using the latest Summer Crush collection:


Komplet składa się z notesu z motywującymi hasłami i kartki na wpisanie najlepszych życzeń :-) Na sprężynie notesu zawiązałam wstążkę i zawieszkę:
The set consists of a notepad with some motivating quotes stamped and a card for writing in the best wishes :-) I tied a piece of ribbon and metal charm on the notepad wire:


Notes zamykany na gumkę. A skąd wziąć różową? Cóż, trzeba kupić białą i pokolorować ;-) Ja barwię gumki Promarkerami - szybko schną, nie brudzą, i można idealnie dopasować kolory :-)
The notebook is secured with elastic band. Where do you get pink ones? Well, you but white and colour it ;-) I colour bands with Promarkers, as they dry quickly and don't stain and you can perfectly match your colour palette :-)


Motto nie tylko dla nerwusów ;-)
The motto is fit not only for those quick-tempered ;-)


Wewnątrz kolejne stemple i kieszonka na luźne kartki: 
There are some more stamped mottos inside and a pocket for loose pages:


Kartka ma ten sam wzór w tle i kolejny piękny obrazek w stylu retro :-)
The card features the same design in the background and another beautiful retro image:


Dodałam też kilka wycinanek, różyczek papierowych i materiałowych oraz perełki:
I also added some diecuts, paper and fabric roses and pearls:


Spis materiałów znajdziecie na blogu MD. Miłego dnia :-)
You wil find the full list of supplies on the MD blog. Have a nice day :-)

środa, 22 lipca 2015

Together

Wiem, wiem, zdjęcia z tej sesji oprawiałam już wiele razy. Ale za każdym razem inaczej ;-)) Tym razem w towarzystwie jednej z nowych kolekcji ScrapBerry's, Birds of Paradise:
I know, I know I scrapped photos from that shoot many times. But each time in a different way ;-)) This time I used one the ScrapBerry's latest colections, Birds of Paradise:


Kompozycję całości oparłam na wzorze papieru, dodając wzór za pomocą maski i gesso, oraz kolejne kwiaty, te wycięte z innego arkusza i te trójwymiarowe i dosłownie kilka dodatków. 
I based the design on the paper pattern and added textured pattern with a stencil and white gesso, tehn added some more flowers and leaves, the cut-out ones and the dimensional ones, and then just a couple of embellies.


Całość jest lekka i delikatna (mimo, że to chłopięcy LO ;-)) i oczywiście przestrzenna:
The whole page turned out light and delicate (though it's a boy page ;-)) and dimensional, of course:


Miłego dnia :-)
Have a nice day :-)

wtorek, 21 lipca 2015

Paris, Paris

Na mój dzisiejszy post dla Craft4You przygotowałam kartkę na bazie prześlicznej kolekcji Sweet Paris, która kilka dni temu pojawiła się w sklepie i od razu mnie urzekła :-)
For my today's post for Craft4You I made a card using the beautiful Sweet Paris collection that a couple of days ago appeared in the store and immediately stole my heart :-)


Ponieważ nie mogłam się zdecydować, który z pięknych wzorów wybrać na tło, zrobiłam tło w formie patchworka ;-)
As I couldn't make up my mind as to which of the beautiful designs I should choose for the background, I employed the patchwork technique ;-)


Do tego dodałam serwetkę, różyczki i wyciętą z jednego z arkuszy wieżę Eiffel'a, i tak powstała kartka w stylu romantycznego shabby chic:
And then added a doily, mini roses and the Eiffel Tower cut out from one of the sheets to receive a romantic shabby chic card:


Oczywiście, nie obeszło się bez miłej dla oka przestrzenności :-)
Of course, I couldn't do without some nice dimension :-)


Podlinkowane materiały znajdziecie na blogu C4Y, a tymczasem - miłego dnia!
You will find linked supplies on the C4Y blog - and now, have a nice day!

sobota, 18 lipca 2015

W kolorach lata / Summer Colours

Wakacyjna dwumiesięczna edycja wyzwania z tablicą inspiracyjną w Maja Design oparta jest na świetnej vintage'owej kolekcji Summer Crush, którą już miałam przyjemność pociąć :-) A do wyzwania przygotowałam ślubną kartkę:
The summer holiday two-month edition of the Maja Design moodobard challenge is based on the gorgeously vintage Summer Crush collection that I already had the pleasure to cut :-) And my sample for the challenge is a wedding card:


Użyłam niewielu tylko dodatków, by nie odwracać uwagi od pięknych wzorów papierów:
I only used a couple of embellishments so that they don't distract the eye from the beautiful papers:


Koniecznie zajrzyjcie na bloga, by obejrzeć prace moich utalentowanych koleżanek z drużyny :-)
You simply must visit the MD blog to see my talented team friends' gorgoeus creations :-)

piątek, 17 lipca 2015

Morskie życzenia / Sea Wishes

Jakiś czas temu na blogu Primy pojawiło się interesujące wyzwanie: użycie w pracy 15 elementów, w układzie 1,2,3,4,5. Miałam kilka pomysłów, ale ostatecznie zwyciężyła taka koncepcja :-)
Some time ago an interesting challenge appeared on the Prima blog: to use 15 elements in a project, using them in a 1,2,3,4,5 way. I had several ideas, but finally this one prevailed :-)


A oto "skład" kartki według przepisu wyzwania:
Here's the card "recipe" according to the challenge requirements:

1 - papier / paper
2 - rodzaje mediów: mgiełki i płatki miki / kinds of media: mists and mica flakes
3 - kawałki sznureczka / pieces of burlap trim
4 - morskie elementy: muszle i rozgwiazda / sea embellies: seashells and a starfish
5 - kwiatów / flowers

Sprawdźcie i policzcie ;-)
Check and count ;-)


Kartka jest dość przestrzenna, a mika pod świtało pięknie błyszczy, jak morskie fale :-)
The card is quite dimensional and the mica shines beautifully against the light, like sea waves :-)


Miłego dnia :-)
Have a nice day :-)

poniedziałek, 13 lipca 2015

Wakacyjne wspomnienia / Summer Memories

Poniedziałek to mój dzień w Maja Design - na mój dzisiejszy post przygotowałam delikatny, nostalgiczny layout ze zdjęciem z naszych wakacji, które mimo, że skończyły się ledwie tydzień temu, są już tylko wspomnieniem...
Monday is my day to post for Maja Design - for my today's post I made this delicate, nostalgic layout with a photo of our holiday trip that though ended just a week ago, can be called only a memory now...


Na arkuszu tła umieściłam podarte skrawki papierów, które mają przedstawiać góry jakby bezpośrednio "wpadające" do morza - bardzo częsty obrazek we Włoszech, na co od razu zwróciłam uwagę.
On the background sheet I layered torn pieces of papers that represent mountains as if directly "dropping" into the sea - a very common picture in Italy that immediately drew my attention.


Użyłam też kilku kolorów mgiełek, które imitują kropelki wody niesione morską bryzą:
Then I splattered several colours of mists to imitate droplets of water sprayed around by the sea breeze:


Kwiaty dobrałam tak, by pasowały nie tylko kolorystycznie: len kojarzy się z żaglami łodzi, które widzieliśmy w porcie Portofino:
I added some flowers that matched my colour palette – I chose the burlap flowers also because the fabric resembles sails of the boats in the Portofino marina where the photo was taken.


Płatki miki, które rozsypałam tu i ówdzie, mają przypominać połyskujące fale...
The mika flakes scattered here and there imitiate the glistening sea waves...


...a gaza udaje morską pianę:
...and cheesecloth is for the seafoam:


Zdjęcie w sepii oprawiłam w naszą najnowszą kolekcję, Summer Crush - a szczegółową listę materiałów znajdziecie na blogu MD. Miłego dnia :-)
The sepia photo looks great with our latest collection, Summer Crushhttp://majadesign.nu/products/summer-crush/ - and for the detailed supply list visit the MD blog. Have a nice day :-)

piątek, 10 lipca 2015

LO 2w1 - z kursem / A 2in1 LO - With a Tutorial

Na mój dzisiejszy post dla Lemoncraft przygotowałam layout, łączący dwie najnowsze kolekcje, Senne Poranki i Wieczne Lato:
For my today's post for Lemoncraft I created this layout, combining our two latest collections, Dreamy Mornings and Neverending Summer:


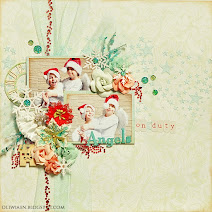
Ale to nie taki zwykły layout ;-) Zwykle wywołuję stos zdjęć, a potem mam problem z wybraniem jednego lub dwóch do scrapa. Chciałabym użyć wszystkich, ale też nie mam tyle czasu, żeby stworzyć album...Pomyślałam więc o połączeniu tych dwóch form i umieściłam minialbum na scrapie. Oto on ;-))
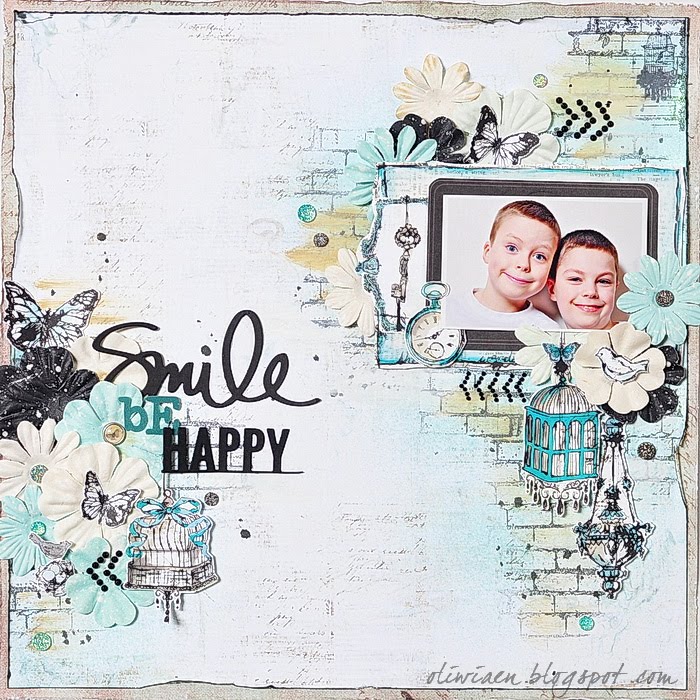
But this isn't just a layout ;-) I usually develop tons of photos and then have difficulty choosing one or two to include in my layouts. I wish I could use all of them, but have no time to make an album...And so I thought of combining the two forms and put a mini into my layout. Here it is ;-))


Wystarczy rozwiązać wstążkę...
You just need to untie the ribbon...


...i rozwinąć harmonijkę:
...and unfold the accordion strip:


...a potem odwrócić :-)
...and then turn it over :-)


Wykonanie takiego albumiku jest banalnie proste, sami zobaczcie :-)
Making such a mini is very simple, just see for yourselves :-)


1. Najpierw wybrałam zdjęcia - mierzą 6x9 cm (oczywiście możecie użyć zdjęć dowolnego rozmiaru). Potem przycięłam pasek papieru o wysokości o 0,5 cm większej, z całej szerokości arkusza 30,5 cm.
1. First, I chose my photos - they measure 6x9 cm (of course you can use any size photos). Then I trimmed a strip of paper measuring 6,5 x 30,5 cm (the full width of a scrapbook sheet).
2. Zbigowałam poszczególne panele pod zdjęcia tak, by każdy był 0,5 szerszy niż zdjęcie. Dzięki temu fotki zyskały niewielką ramkę. Zagięłam panele wzdłuż linii tak, by utworzyć harmonijkę. Jak widać, ostatni panel jest krótszy od pozostałych.
2. I scored sections in the paper strip so that each one is 0,5 cm wider than the photo. Thus my photos get a little frame around. I folded along the score lines, making an accordion strip. As you can see, the last section is narrower than the others.
3. Potuszowałam brzegi zdjęć i linie harmonijki.
3. I inked the edges of the photos and folds of the accordion strip.


4. Ozdobiłam jedną stronę harmonijki, ze stroną "tytułową".
4. I decorated one sided of the accordion strip, with the "title" panel.
5. Ozdobiłam drugą stronę harmonijki.
5. I decorated the other side of the accordion strip.
6. Docięłam dodatkowy panel ze zdjęciem...
6. I cut an extra panel with a photo...
7. ...i nakleiłam go na krótszym panelu.
7. ...and placed it over the narrow panel.


8. Złożyłam harmonijkę i przewiązałam ją wstążką.
8. I folded the strip and tied it with ribbbon.
9. Odwróciłam przewiązaną harmonijkę i przykleiłam wstążkę taśmą klejącą, a następnie całość posmarowałam klejem. 
9. I turned the folded strip over and secured the ribbon with a piece of sticking tape and then covered the whole panel with glue.
10. Nakleiłam harmonijkę w wybranym miejscu na scrapie.
10. I placed the accordion strip in the chosen spot on my layout.
Gotowe :-)
You're done :-)
Prawda, że proste? Harmonijka może być tak długa, jak chcecie - przedłuża się ją naklejając końcowe panele pasków na siebie. Możecie ją wykorzystać do umieszczenia serii zdjęć albo journalingu - ogranicza Was tylko wyobraźnia ;-)
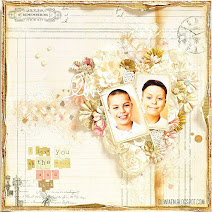
I jeszcze kilka szczegółów layoutu:
Simple, isn't it? The accordion strip can be as long as you wish - you can lengthen it by layering end panels one over the other. You can use the strip to include a series of photos or for journaling - your imagination is the limit ;-)
And here are some details of the layout:


Na blogu Lemoncraft znajdziecie podlinkowaną do sklepu listę materiałów. Miłego wieczoru :-)
You will find the list of supplies I used with links to the store. Have a nice evening :-)