
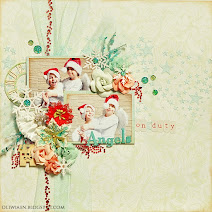
For my tutorial post for Lemonade I wanted to share something even beginners can easily follow :-) Using the papers, elements and stickers from the This Is A Man's World collection, I made this masculine card and presented step by step how to :-)

Potrzebne będą:
- kolekcja This is a man's world
- wybrany stempel z napisem
- sznureczek
- nożyczki
- klej i kosteczki 3D
- tusze do odbitek i tuszowania
- kilka perełek, kryształków bądź ćwieków do dekoracji.
You'll need:
- This is a man's world collection
- sentiment stamp of chocie
- a piece of string or ribbon
- scissors
- glue and 3D dots
- inks for stamping and inking
- a couple of pearls, crystals or brads for decoration
1. Z arkusza dodatków wycięłam wybrane elementy: 1. I cut out selected elements from the Elements sheet:

2. Wybrane papiery docięłam na wymiar: 13,5 x 13,5 cm, 13x13 cm oraz węższe paski, ok. 5x13 i 1x13 cm. Docięłam też kartonik pod obrazek z żaglówką tak, by powstała cienka ramka wokół obrazka.
2. I trimmed selected papers to get the sizes: 13,5 x 13,5 cm, 13x13 cm and two narrower stripes, ca. 5x13 cm and 1x13 cm. I also trimmed a piece of paper to mat the sail image, so that there's a thin frame around it.

3. Z tego samego papieru wycięłam dwa małe kwadraciki, które następnie rozcięłam wzdłuż przekątnej:
3. Using the same matting paper I cut out two small squares and then cut them along the diagonal.

4. Podkleiłam obrazek papierem, a trójkąciki nakleiłam w narożnikach, co dodatkowo podkreśla charakter vintage:
4. I matted the image and then attached the small triangles in corners, to additionally emphasise the vintage character:

5. Potuszowałam i postarzyłam brzegi papierów:
5. I inked and distressed the edges of papers:

6. Postarzyłam pozostałe wycięte elementy. Bok obrazka owinęłam sznureczkiem i przymocowałam do niego kotwicę. Sznureczek zawiązałam też na tagu:
6. I distressed also the other cut-out elements. I tied a piece of twine around ode side of the image and attached the paper anchor. I also tied a piece of twine to the tag:

6. Na wyciętym bileciku odbiłam napis:
6. I stamped the sentiment on the cut-out tag:

7. Z arkusza naklejek wybrałam słowo i podkleiłam go na kosteczkach 3D.
7. I selected a word from the stickers sheet and then mounted it on 3D dots.

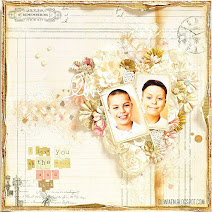
8. Teraz pozostaje już złożenie elementów w całość :-) Ułożyłam papiery w warstwowe tło i dla urozmaicenia chlapnęłam tu i tam tuszem w płynie:
8. Now it's time to put the elements together :-) I layered my background and splashed here and there for more interest:

9. Poszczególne elementy podkleiłam kosteczkami i ułożyłam w kompozycję:
9. I mounted the elements on 3D dots and arranged them on the background:

10. Na koniec nakleiłam kompozycję na bazę i dodałam kilka kryształków:
10. Finally, I attached my composition onto a card base and added a couple of crystals:


Spis podlinkowanych materiałów znajdziecie na blogu Lemonade :-)
You will find linked supplies on the Lemonade blog :-)


4 komentarze:
Piękna praca:)
Ślicznie wyszła Maju. Twoje męskie kartki zawsze są rewelacyjne :)
Oj te męskie są takie trudne...
Z takich elementów to prawie sama się składa :)))) świetny i bardzo czytelny kursik
Prześlij komentarz