Mimo świątecznych dekoracji na ulicach i w sklepach nijak nie mogę się nastroić na świąteczną wenę ;-) Ale cóż, czas już najwyższy na kartki, więc trochę bez przekonania - ale jest, pierwsza w tym roku ;-))
Despite holiday decorations in the streets and shops I can't make myself feel like Christmas ;-) But well, it's high time to start with the Christmas cards, so even though half-heartedly, here it is - the first one this year ;-))
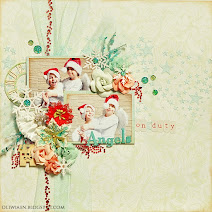
Mam nadzieję, że widać, że detale podkreśliłam brokatem? A jemiołę wycięłam w brokatowym kartonie:
I hope you can see the details are accented with glitter? And I die-cut the mistletoe in glitter cardstock:
Nie mogę się nadziwić precyzji tego napisu ze Scrapińca :-)
I'm really stunned with the precision of that sentiment from Scrapiniec :-)
W roli jagódek wystąpiły perełki i pomponiki:
I used pearls and pompoms for berries:
Podobnie jak w zeszłym roku, postanowiłam zużyć zapasy i nie kupować
niczego nowego w temacie świątecznym. Co prawda, właściwie wszystkie
materiały tutaj są nowe, ale papiery kupiłam w czerwcu i październiku,
wykrojniki też, napis dostałam gratis, więc się nie liczy, prawda? :-))
Just
like last year, I decided to use up my stock and not to buy anything
new Christmas-themed. Well, to be honest, everything here is rather new,
but I bought the papers in June and October, dies too, and I got the
sentiment free, so that doesn't count, right? :-))
piątek, 28 listopada 2014
wtorek, 25 listopada 2014
Good Times
Kiedyś umieszczenie więcej niż jednego zdjęcia na LO było dla mnie prawdziwym wyzwaniem! Na szczęście odkryłam programy graficzne pozwalające na łączenie kilku zdjęć w jedno i uzyskanie w ten sposób zdjęć o mniejszym rozmiarze. I tak teraz często układam ich na scrapie 3 czy 4 i wciąż jeszcze widać tło ;-) Tak jak na poniższym LO, który przygotowałam na mój dzisiejszy post dla Craft4You:
At the beginning of my scrapbooking adventure placing more than one photo on a layout was a true challenge for me! Luckily I discovered photo processing programs that allow to combine several photos into one and getting a smaller size of the single photo. And now I often use 3 or 4 pics on a layout and can still see the background paper ;-) Just like on this LO I made for my today's post for Craft4You:
Po ułożeniu warstw tła i ostemplowaniu go jednym z moich najbardziej ulubionych motywów tłą, czyli "kamienny murek", ozdobiłam zdjęcia bilecikami wyciętymi z jednego z arkuszy, kwiatami, kryształkami i tekturową grilandą spryskaną mgiełkami dla odrobiny blasku ;-) :
I layered papers for the background and stamped it with one of my all-time favourite background stamps, i.e. stone wall. Then I decorated the photos with tickets, flowers, crystal circles and a chipboard banner that I sprayed with some mists for a bit of glam ;-):
Pomiędzy warstwami umieściłam gazę i kawałki ozdobnego bordera z dziurkacza, który został po jakimś innym projekcie - uwielbiam wykorzystywać skrawki :-)
Between the layers I put pieces of cheesecloth and a decorative punched border I prepared for some other project - I love using u leftovers :-)
Listę materiałów znajdziecie na blogu C4Y :-)
You will find the lined supplies on the C4Y blog :-)
Etykiety:
Craft4You,
Kuba,
LO 30x30,
Prima,
projektuję / DT work
poniedziałek, 24 listopada 2014
Złote Gody / Golden Anniversary
Ogromnie lubię takie piękne rocznice :-) W świecie, w którym rozwody i rozstania wydają się częstsze niż śluby, a zamiast pracy nad sobą i walki o związek promuje się "wymianę na lepszy model", takie okazje dają jednak nadzieję :-)
I love such beautiful anniversaries :-) In the times when divorces and break-ups seem more common than weddings and they suggest you to "replace with a better model" rather than working on your character and the relationshi, such an occassion gives you some hope :-)
Całość, zgodnie z życzeniem Zamawiającej, utrzymana w stylu retro shabby...
Following the Orderer's wishes, I kept the card in the retro shabby style...
...a kwiatom i tekturkom dodałam odrobiny blasku przy pomocy mgiełki i brokatu:
...adding some glam to the flowers and chipboard with mists and glitter:
Miłego dnia Wam życzę :-)
I wish you a good day :-)
Etykiety:
kartki / cards,
rocznice / anniversaries
środa, 19 listopada 2014
Ślub w kolorach jesieni / Autumn Colours Wedding Card
Na wczoraj przypadł również mój post dla Craft4You, na który przygotowałam ślubną kartkę. Ponieważ korzystałam z materiałów Primy, sięgnęłam po listopadową paletę PPP, w której znalazłam całą gamę brązów, a że lubię je od zawsze, postanowiłam zrobić kartkę w barwach jesieni :-)
Yesterday was my turn to post for Craft4You. As I used Prima products, I decided to use the November PPP palette that features a whole range of browns and since they are my all-time favourites, I decided to make this wedding card in the autumnal colours :-)
Żeby nieco urozmaicić tło, postanowiłam odbić na nim motyw gazetowy w nieregularny wzór. Można oczywiście potuszować niepełny motyw małą poduszką tuszu i tak go odbić, ale akurat miałam dużą poduszkę tuszu, którą ciężko potuszować fragmenty. Oderwałam więc dwa paski papieru i ułożyłam je na arkuszu...
To make the bakground paper more interesting, I wanted to stamp some newspaper motif in an irregular way. Of course you can ink the stamp with a small inkpad and then stamp, but I had this brown ink only on a large pad that makes it a bit difficult to ink only parts of the image. And so I tore two strips of paper and put them on the paper...
...i odbiłam motyw. Po kilkukrotnym przełożeniu pasków i stemplowaniu, moje tło było gotowe:
...and stamped the image. After rearranging the strips and stamping a couple of times, I got my background finished:
I już można było układać na nim główną kompozycję :-)
And then I was ready to arrange decorative elements on the background :-)
Podlinkowane materiały znajdziecie na blogu C4Y. Miłego dnia :-)
You will find linked supplies on the C4Y blog. Have a nice day :-)
Etykiety:
Craft4You,
kartki / cards,
kursy / tutorials,
Prima,
Prima PPP,
projektuję / DT work,
ślub / wedding
wtorek, 18 listopada 2014
Wykonany z przyjemnością II / Made With Pleasure II
Na mój dzisiejszy post dla Maja Design przygotowałam kolejny wyjątkowy layout. Kolejny, bo jeden już pokazywałam - i cieszę się bardzo, że kolejna Osoba z wielkim sercem postanowiła pomóc Stasiowi, a ja dzięki temu mogłam oprawić Jej zdjęcie. I oto efekt:
For my today's post for Maja Design I prepared another special layout. Another - because I already shared one of the kind - and I'm so happy another Person with a big heart decided to help little Stas which allowed me in turn to scrap her photo. And here's the result:
A oto kilka szczegółów:
Here are the details:
Tytuł LO - Carpe Diem - nawiązuje do okazji, przy której powstał: ważny jest każdy moment w życiu, żadna sekunda już nigdy się nie powtórzy, ważne jest więc, by ją uchwycić i przeżyć świadomie. I ważne jest, żeby umieć dostrzec obok potrzebującą osobę i pomóc jej na miarę możliwości. Jedna osoba nie pomoże wszystkim, ale razem możemy naprawdę wiele, a dobro zawsze powraca :-) I dlatego mam nadzieję, że jeszcze niejeden taki scrap powstanie :-)
The title of the LO - Seize the Day - refers to the occassion it was made for: every moment of life is important, no second would happen again so it's crucial we seize it and live through. And it's important to be able to notice a person in need and help them as we can. One man can't help everyone, but together we can so much more and what goes around always comes around :-) And I hope I'd be able to make many more layouts of the kind :-)
Etykiety:
LO 30x30,
Maja Design,
projektuję / DT work
poniedziałek, 17 listopada 2014
Love You!
Dzisiaj kolejna kartka z serii zestawów ScrapBerry's - tym razem słodkie wyznanie miłosne :-)
Today another card from the ScrapBerry's kits series - this time a sweet love confession :-)
Kartka prościutka, delikatna, a jej głównym motywem są urocze misiaki. Kilka razy już natknęłam się w necie na taki sposób kolorowania motywów - z białymi, embossowanymi konturami - i postanowiłam spróbować:
The card is very simple, delicate and its main motif is this cut bear couple. I've already seen in the Internet this kind of image colouring - with white embossed silhouette - and I decided to try it:
Dzięki białym konturom obrazek wydaje się leciutki, bardzo pastelowy - a taki efekt bardzo mi pasował do tego obrazka :-) Poszczególne elementy ozdobne to też stempelki, z tego samego zestawu:
Due to white contours the image seems very light and pastel - the kind of effect I found very appropriate for this image :-) I also stamped other stamps of that set and used them as decorative elements:
Dodałam też kwiatuszki wiśni i epoksydowy zegar:
I also added cherry blossom flowers and an epoxy clock:
Wszystkie wykorzystane w kartce materiały pochodzą z zestawów, a poszczególne produkty możecie kupić w Polsce :-)
All the supplies used in the card are included in the kits and you can buy particular products in Poland too :-)
piątek, 14 listopada 2014
Wyjątkowy letni czas / Special Summertime
Dzisiaj wyjątkowo coś nie mojego, ale z czego jestem dumna bardziej niż z własnych prac! :-) Na zlocie w Krakowie powiedziałam Marcie z Magicznej Kartki, że jeszcze nie zdobyłam się na pocięcie Jej pięknych papierów z kolekcji Rafa Kolorowa. Po powrocie Kuba zapragnął obejrzeć owe papiery, i on z kolei się nie wahał wcale ;-) Specjalnie dla babci zrobił tego oto scrapa:
Today something which is not mine, but makes me proud so much more than any of my own creations! :-) During the Kraków crop I told Marta from Magiczna Kartka that I couldn't make myself to cut her beautiful Rafa Kolorowa papers. When we got back home, Kuba asked to see those papers, and he didn't hesitate a moment ;-) He made this layout especially for his Grandma:
Kompozycja i dodatki są jego pomysłem, ja jedynie użyczyłam materiałów (i kwiatka, których kilka zrobiłam przy okazji tej kartki) i wspomogłam trochę od strony technicznej (np. pokazałam, jak kleić koraliki i flowersoft) - i wybaczcie dumnej matce, ale uważam, że jak na 10-latka spisał się świetnie :-))
The design and embellies are of his choice, I only let him use whatever he needed (and gave him one of the flowers I made while working on this card) and helped a little technically (e.g. I showed him how to glue minibeads and flowersoft) - forgive the proud mother, but I think that as for a 10-year-old he did fantastic :-))
Jak widać, odziedziczył po mnie zamiłowanie do przestrzenności i nie unika brokatu ani kwiatów ;-) - i...też pracuje na podłodze :-))
A tak pod nabożnym wzrokiem Filipa farbował gazę (mgiełki od razu mu się spodobały!):
As you can see, he inherited my love for dimension and love for glitter and flowers ;-) - and...working on the floor :-))
Here's how he coloured the cheescloth (he immediately loved the mists!), watched carefully by the respectful Filip:
I jeszcze trochę brokatu...
Some more glitter...
Mamy nadzieję, że Babci się spodoba :-)
We now both hope Grandma would like it too :-)
Etykiety:
Kubuś projektuje / Kuba's DT work
wtorek, 11 listopada 2014
Carpe Diem
Na mój dzisiejszy post dla Craft4You przygotowałam LO z optymistycznym tytułem, zachęcającym do korzystania z każdej chwili :-)
For my today's post for Craft4You I created this LO with an optimistic title that encourages to seize the day :-)
LO powstał na bazie produktów Primy, do listopadowej mapki BAP. Najpierw na bazie "drewnianego" arkusza (uwielbiam wszelkie deseczki ;-)) odbiłam kilka kleksów i psiknęłam złotą mgiełką, a potem białym żelowym pisakiem odrysowałam zawijasy z maski z jednej z pierwszych serii tychże ;-))
I made the LO using Prima products and their November BAP sketch. Firstly, I made some stains and sprayed golden mist on the "wooden" paper (I love that kind of pattern ;-)), and then drew some swirls using a white gel pen and one of the first Prima stencils :-)
Tytuł pochodzi z wykrojnika:
I die-cut the title:
Pod zdjęciem są warstwowe etykiety wycięte z arkusza, a pomiędzy nimi umieściłam kawiaty:
I layered some tags cut out from paper and placed some flowers in between:
Rolę journalingu pełni zaś stemplowany napis:
I used a stamp for the journaling:
Miłego świętowania! :-)
Have a nice day! :-)
poniedziałek, 10 listopada 2014
"Męski" ślub / A "Masculine" Wedding
W zamieszaniu zeszłego pracowitego tygodnia zapomniałam całkiem o pracy na mój wtorkowy post dla Craft4You - oto ona :-)
In the fuss of the last busy week I totally forgot my creation for the Craft4You Tuesday post - here it is :-)
Do wykonania kartki ślubnej użyłam papierów z "męskiej" kolekcji Mister Fox:
To make this wedding card I used papers from the "masculine" Mister Fox collection:
Dodałam kawałek eleganckiej gipiury:
I added a piece of elegant guipure lace:
...a w centrum umieściłam jutowy panel z kwiatową kompozycją:
...and in the centre I placed a burlap panel with some flower arrangement:
I jak Wam się podoba takie wydanie kartki ślubnej? :-)
How do you find such version of the wedding card? :-)
Etykiety:
Craft4You,
kartki / cards,
projektuję / DT work,
ślub / wedding
czwartek, 6 listopada 2014
Just For You
Dzisiaj mam dla Was kolejną kartkę przygotowaną z miksu zestawów dodatków ScrapBerry's:
Today I'm sharing another card I made using the mix of Product Kits by ScrapBerry's:
Kartce nadałam formę zbliżoną kształtem do centralnego elementu, czyli pięknej metalowej plakietki z napisem:
The card is shaped like the central decorative element, i.e. the beautiful metal sentiment plaquette:
Nie chciałąm, by pozostałe dodatki przytłoczyły plakietkę, dodałam wiec tylko kilka kwiatów, misterną klateczkę i zawijasy z wykrojnika:
I didn't want the other embellies to overwhelm the plaquette so I added only a couple of flowers, a filigree birdcage and die-cut flourishes:
Miłego dnia :-)
Have a nice day :-)
Subskrybuj:
Posty (Atom)