Na mój dzisiejszy post dla Maja Design przygotowałam delikatną, romantyczną kartkę z najnowszej kolekcji, Celebration:
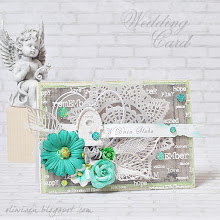
For my today's post for Maja Design I created a delicate, romantic card using the latest release, the Celebration collection:
Wybrałam pastelowy turkus i elegancki wzór zawijasów na tło, musnęłam jego brzegi brokatową pastą, a następnie dodałam pasujący odcień papieru z kolekcji Monochromes oraz subtelne kropeczki:
I selected the pastel turqouise and elegant flourish for my background, brushed its edges with glitter paste and matted it with a matching shade of the Monochromes paper and subtle polka dots:
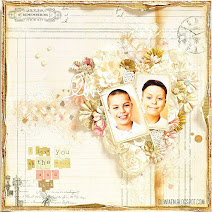
Na tak przygotowanym tle umieściłam kompozycję kwiatów i skrzydeł z masy, dodałam stemplowany na kalce i embossowany napis i uzupełniłam całość brokatowymi kropelkami, perełkami w płynie i gazą:
On that background I placed a flower arangement with art clay wings, added a sentiment stamped on vellum and embossed with gold ep, and finished off my design with glittery drops, liquid pearls and cheesecloth:
Kartka jest dość przestrzenna, dlatego dodałam Latarniowe pudełko, które ozdobiłam metaliczną taśmą washi w kropeczki:
The card turned out pretty dimensional, and so I added a Latarnia Morska box that I decorated with a metallic dots washi tape:
Listę materiałów znajdziecie na blogu MD.
Miłego dnia!
Visit the MD blog for a list of supplies.
Have a nice day!
środa, 28 lutego 2018
wtorek, 27 lutego 2018
Brokatove love / A Glitter Valentine Card
W zamieszaniu feriowym "zgubiła" mi się trzecia kartka, która powstała w ramach zabaw z kraftową kolekcją Piątku Trzynastego (pierwszą możecie zobaczyć tu, a drugą tutaj), w tematyce Walentynek :-)
Today I'm sharing a card that got "lost" within the winter break havoc ;-) It's the third one (you can view the first one here, and the second one here) I made playing with the kraft collection by Piątek Trzynastego, and it has a Valentine theme :-)
Tym razem tło potraktowałam różnokolorowymi mgiełkami, które następnie zmieszały się i zlały tworząc delikatnie lśniące, akwarelowe tło. Na nim ułożyłam kompozycję z mini różyczek i brokatowych serduszkowych "lizaków":
This time I misted the background with various colours of mists which then mixed to give a delicately shiny, waterecolour background. Then I placed a mini roses bouquet and glittery heat "lollipops":
Na koniec dodałam napis wycięty wykrojnikiem w złotym metalicznym kartonie i złote perełki. Brzegi warstw tła pociągnęłam złotą farbą:
I finished my card off with a sentiment die cut from metallic gold cardstock, and some gold pearls. I also touched the edges of background layers with gold paint:
Miłego dnia :-)
Have a nice day :-)
Etykiety:
kartki / cards,
Walentynki / St. Valentine's
czwartek, 22 lutego 2018
Męska walentynka / Masculine Valentine Card
W moim dzisiejszym poście dla the ScrapBerry's pokazałam walentynkę w męskim stylu:
In my today's post for the ScrapBerry's I shared a masculine Valentine card:
Użyłam papierów z kolekcji Words Live Forever i dodatków z kilku innych kolekcji. W centrum umieściłam serce z masy, które pomalowałam metalicznymi farbami i czarnym gesso, a następnie dodałam ozdoby:
I used papers from the Words Live Forever set and embellishments from various collections. In hte centre I placed a clay heart that I painted with black gesso and metallic paints and then decorated with embellishments:
Spis użytych materiałów znajdziecie na blogu SB.
Miłego dnia!
Visit the SB blog for a full list of supplies.
Have a nice day!
niedziela, 18 lutego 2018
Love Grows Here
Niedawno świętowaliśmy Walentynki, stąd mój post dla Scrapki.pl przepełniony jest miłością :-)
We've celebrated St.Valentine's Day recently, and so my post for Scrapki.pl is filled with love :-)
Nasze rodzinne zdjęcie "ubrałam" w moją ulubioną kolekcję zeszłego roku, czyli Zella Teal od Primy:
I decorated our family photo with my favorite collection of the last year, i.e. Zella Teal by Prima:
Zaś "miłosny" tytuł to brokatowa naklejka American Crafts:
Whilst the "love" title is a glitter sticker by American Crafts:
Szczegóły materiałowe znajdziecie na Scrapkowym blogu.
Miłego dnia :-)
The supplies deatils are on the Scrapki blog.
Have a nice day :-)
Etykiety:
LO 30x30,
Prima,
projektuję / DT work,
Rodzinne / Family,
Scrapki.pl
środa, 14 lutego 2018
Exploding box w fioletach / A Mauve Exploding Box
Na mój dzisiejszy post dla Maja Design przygotowałam ślubny exploding box z najnowszej kolekcji Celebration:
For my today's post for Maja Design I created a wedding exploding box using the latest Celebration collection:
Paleta kolorystyczna nie jest może typowa dla prac ślubnych, a na pewno niezbyt typowa dla mnie ;-) Ale w tym zestawieniu wzorów wydawała mi się na tyle ciekawa, żeby się skusić ;-)
The colour palette is perhaps not very typical for the wedding projects, and definitely not typical for me ;-) But the selection of patterns seemed tempting enough to give it a try ;-)
Box tradycyjnie zawiera opisane kieszonki na banknoty oraz miejsce na wpisanie życzeń:
The box traditionally contains pockets for putting in money gifts and the space fro writing in wishes:
A w centrum - misternie wycinany tekturkowy tort, który ozdobiłam mini różyczkami i koronką:
And in the centre - a filigree chipboard cake that I decorated with lace and mini roses:
Spis materiałów znajdziecie na blogu Maja Design - a tymczasem życzę Wam dnia pełnego miłości :-)
Visit the Maja Design blog for a list of supplies - and have a love-filled day today :-)
Etykiety:
exploding box,
Maja Design,
projektuję / DT work,
ślub / wedding
wtorek, 13 lutego 2018
Walentynka vintage / A Vintage Valentine Card
Już jutro Walentynki :-) Chociaż nie podoba mi się małpowanie cudzych tradycji, to jednak to święto jest tak miłe, że nie jestem przeciwna ;-)) I dlatego na mój post dla the ScrapBerry's przygotowałam kartkę walentynkową w moim ulubionym stylu vintage:
It's St. Valentine's Day tomorrow :-) Although I don't like copying foreign customs, but this holiday is so nice I don't mind joining in ;-)) And so for my post for the ScrapBerry's I created a Valentine card in my favourite vintage style:
Kartka bazuje głównie na dwóch kolekcjach: Primavera i Holiday Romance. Na warstwach postarzonych papierów ułożyłam wykrojnikową serwetkę, wycięty z jednego z arkuszy Words Are Forever zegar, mini pocztówkę i uroczą rycinę dzieci. Dodałam tekturkową chmurkę z serduszkiem, jakby chłopiec czynił właśnie miłosne wyznanie swej małej ukochanej ;-))
The card is based mainly upon two collections: Primavera and Holiday Romance. I layered distressed papers, added a paper die-cut doily, a clockface cut out form one of the Words Are Forever papers, a mini postcard and a cute image of kids. I added a chipboard heart cloud, as if the boy was declaring love for his little sweetheart ;-))
Dodałam też tekturkowy napis w rameczce i kompozycję kwiatową:
I also added a chipboard sentiment in a decorative heart frame and a flower cluster:
Szczegóły dotyczące materiałów znajdziecie na blogu the ScrapBerry's.
Miłego dnia :-)
Supplies details are on the ScrapBerry's blog.
Have a nice day :-)
piątek, 9 lutego 2018
Kartki z resztek / Left-overs Cards - My Creative Scrapbook
I tradycyjnie już, z resztek kitu Liimited Edition od My Creative Scrapbook zrobiłam kartki:
As usually, I made some cards using the left-overs of the Limited Edition kit by My Creative Scrapbook:
Jak leśne poszycie:
Like a forest bed:
Na spełnione życzenia:
For making wishes:
I walentynkowa:
And a Valentine card:
I to już wszystko - kolejna odsłona już za miesiąc.
Dziękuję za odwiedziny i miłe słowa!
And that's all - another kit reveal in a month's time.
Thank you for visiting and kind words!
czwartek, 8 lutego 2018
Joy - My Creative Scrapbook
Ostatni z layoutów, jakie przygotowałam z lutowego kitu Limited Edition od My Creative Scrapbook to moja wersja clean&simple :-))
The last layout I made using the February Limited Edition kit from My Creative Scrapbook is my version of clean&simple :-))
Oczywiście z klasycznym c&s nie ma to nic wspólnego ;-) Po prostu użyłam minimalną jak na mnie ilość dodatków, by nie odwracać uwagi od wzoru z maski, którym pokryłam niemal całe tło, oraz od cudnej ramki Primy, którą pokolorowałam mgiełkami i złotą farbą akrylową.
Of course, it has nothing to do with the classic c&s ;-) I just used a minimum amount of embellishments as for my usual style, in order not to distract the focus from the stencil pattern that covers almost entire background and a gorgeous Prima frame which I coloured with mists and golden acrylic paint.
Dla dodania elegancji podkreśliłam wzór maski perłowymi kropelkami. Tytuł ułożyłam z piankowych literek:
To add some elegance I accented the stencilled pattern with pearl dots. The title is arranged using foam letters:
A jutro - resztki :-)
Come back tomorrow for some leftovers :-)
środa, 7 lutego 2018
Secret Garden - My Creative Scrapbook
Trzeci z kolei layout z lutowego kitu Limited Edition od My Creative Scrapbook to jedyny, w którym nawiązałam do wróżkowej tematyki kolekcji Fairie Dust :-)
The third layout I made using the February Limited edition kit by My Creative Scrapbook is also the only one in which I used elements of the fairy theme of the Fairie Dust collection :-)
Jako tło wykorzystałam dwa arkusze tego samego wzoru, tworząc wywijane fragmenty. Powycinałam kilkanaście motywów z różnych arkuszy i ułożyłam je wokół zdjęcia, dodałam też przepiękne kwiaty i listki 49&Market:
I used two sheets of the same paper for my background, creating folded parts. I cut out several motives from various papers and arranged them around my photo, I also added gorgeous flowers and leaves by 49&Market:
A jutro ostatni już layout, choć nie koniec prac ;-)
Drop by tomorrow for the last layout, though it'll not be the end of projects ;-)
wtorek, 6 lutego 2018
Oh Baby - My Creative Scrapbook
Dzisiaj drugi z kolei layout z lutowego kitu od My Creative Scrapbook:
today I'm sharing the second layout I made using the February Limited Edition kit from My Creative Scrapbook:
Tym razem dwa żółto-pomarańczowe "tyły" papierów kolekcji Fairie Dust od Graphic 45 pasowały do wybranego zdjęcia w sepii - podobnie jak "akwarelowe" kwiaty Primy. Ponieważ kwiaty 49&Market, które zawarte są w kicie, był tylko fioletowe, dodałam też nieco fioletu tuszując naniesiony z maski wzór.
This time I used the two yellow-orange "back" sides of the papers from the Graphic 45 Fairie Dust collection as they matched my sepia photo - just like the "watercolour" Prima flowers. As the 49&Market flowers in the kit are purple only, I added purple inking over the stencilled pattern.
Mimo, że ten layout zawiera wszystkie kolory, których nie lubię ;-)) efekt całkiem mi się podoba! A Wam?
And even though the layout contians all the colours I don't like ;-)) I still like the result. Do you?
Subskrybuj:
Posty (Atom)