skip to main |
skip to sidebar
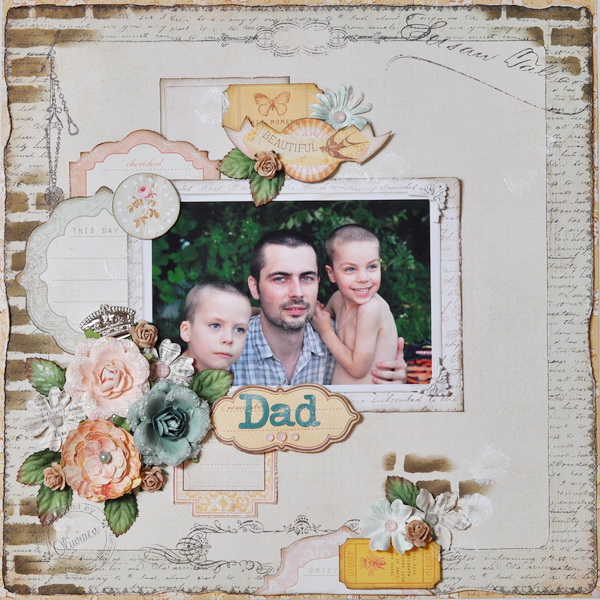
Wczoraj świętowaliśmy Dzień Ojca, więc na mój dzisiejszy post dla Maja Design przygotowałam ramkę w męskim stylu, ze zdjęciami Taty i Synów :-) A w tle tego projektu - mała opowieść o tym, jak to scrapperka nie wyrzuca niczego, nawet...zepsutych pudełek ;-)
Otóż, jak zapewne wiecie, większość moich kartek jest na tyle przestrzenna, że wymaga pudełek (korzystam z tych od Latarni Morskiej). I czasem zdarzy mi się coś krzywo skleić, pobrudzić, albo...przydepnąć. Ale czy można tak po prostu wyrzucić kawałek dobrego kartonu tylko dlatego, że jest uszkodzony? No nie można! I przy okazji projektu na Dzień Ojca przyszedł mi do głowy pomysł, jak by te "psujki" wykorzystać:
Yesterday we celebrated Father's Day, and so for my today's post for Maja Design I created a masculine frame with photos of Dad and Sons :-) And here's a little background story for the project about how a true scrapper never throws anything away, even broken box elements ;-)
Well, as you may have realised most of my cards are bulky enough to require boxes (I use Latarnia Morska ones). And sometimes I happen to glue a wonky one, or stain one, or...step on one. But can you throw away a piece of decent cardstock just like that only because it's broken? No, you can't! And while getting ready for thiss Fahter's Day project I had an idea how to use up those broken box elements:
Jak widać, "kolekcja" zawiera wieczka i denka pudełek w różnych rozmiarach i kolorach. Najpierw zatuszowałam różnicę w kolorach i to dosłownie, tuszując krawędzie:
As you can see, the "collection" contains lids and bottoms of boxes in various sizes and colours. First I inked all the outside edges to mask the difference in colour:
...i okleiłam zewnętrzne boczki taśmami washi:
...and covered the outer sides with washi tapes:
A potem już ozdabianie - moimi ulubionymi papierami męskimi z kolekcji Denim&Friends:
And then I only had to decorate the insides with my all-time favourite masculine papers from the Denim&Friends collection:
Najpierw ozdobiłam większe pudełka, te ze zdjęciami:
I first decorated the larger boxes with photos:
...a potem te mniejsze, z ozdobami:
...and then the smaller ones with embellishments:
A potem ułożyłam je w jedną całość i skleiłam mocną dwustronną taśmą:
And then I arranged them all in one composition and glued with strong double-sided adhesive tape:
Aby dodatkowo wzmocnić konstrukcję, odrysowałam kształt ramki na największym kartonie, jaki znalazłam w domu ;-)) i wycięłam nieco mniejszą wielkość, by nic nie wystawało spod ramki:
To make the whole construction more sturdy, I treaced the shape of the frame on the largest cardboard piece I could find at home ;-)) and cut it out a bit smaller so that nothing peeks outside of the frame:
Całość prezentuje się bardzo fajnie nad biurkiem Taty, a różne wysokości pudełek są dodatkowym smaczkiem :-)
I really like the way it looks above the Daddy's desk :-) Different heights of the boxes sides add even more interest to the design :-)
A dla najbardziej wytrwałych - rzut oka na szczegóły:
For the most persistent of you - a quick look at details:
Listę materiałów znajdziecie na blogu Maja Design, a pudełka - tutaj.
Miłego dnia!
You can check the supplies list on the Maja Design blog and but the boxes here.
Have a nice day!
Druga część projektów resztkowych z czerwcowego kitu Limited Edition obejmuje prace, do których dodałam złoty karton jako bazową wersję tła, ponieważ nie zostały już żadne duże kawałki papierów :-)
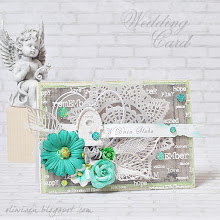
I tak: kartka motylowa ślubna - tu miałam jeszcze jeden większy kawałek, ale mniejszy od bazy:
The second part of the leftovers projects using the June Limited Edition kit includes projects to which I added extra golden cardstock as the base background layer since there were no pieces large enough to use them :-)
And so: a butterfly wedding card - here I had one larger piece, but still smaller than the card base:
Pozostałe mniejsze kawałki wystarczyły na oklejenie ślubnego boxa (baza od Latarni Morskiej) - tu również użyłam złotego kartonu na dolne warstwy:
The remaining smaller pieces were sufficient for a wedding exploding box (with the Latarnia Morska box base) - I also used the golden cardstock for the base layers:
I tu już nie pozostało nic innego, jak z najmniejszych skrawków powycinać dziurkaczem kwadraciki na tło patchworkowe :-)) Kompozycja zaś powstała z die-cutów i naklejek:
At that point I had no choice but to punch squares out of the remaining pieces to make a patchwork background :-)) The top design was made using die-cuts and stickers:
I ostatecznie z całego kitu pozostało, co następuje:
And finally here's what was left from the kit:
Jak widać, z papierów zostały maleńkie kawałeczki, ale jest jeszcze sporo literek, kilka die-cutów i naklejek tekturowych oraz, oczywiście, stemple i maski :-) Do kolejnych prac jak znalazł :-)
As you can see, there are only tiny pieces of papers, but there are still quite a few glitter letters, some die-cuts and cardsotck stickers and, of course, stamps and stencils :-) Perfect for more projects :-)
Miłego dnia!
Have a nice day!
Ponieważ, tak jak wspominałam na początku, z czerwcowego kitu Limited Edition od My Creative Scrapbook powstało aż 10 prac, postanowiłam nie męczyć Was nadmiarem zdjęć i podzieliłam posty z "nadwyżkami" na dwie części. Dzisiaj kartki, które powstały z największych kawałków papierów pozostałych po layoutach :-)
As I mentioned at the beginning of this little series, I made as many as ten projects using the June Limited Edition kit and so I decided not to overwhelm you with too many photos and split the leftovers projects into two parts. Today I'm sharing the cards that were made with the largest paper pieces left after I made the layouts :-)
Ślubna kartka DL:
A wedding DL card:
Ślubną kartkę z konikami morskimi :-)
A wedding sea horses card :-)
...i kartkę na każdą okazję:
...and an all-occasion card:
I tu skończyły mi się duże kawałki ;-)
And here's where my large pieces were gone ;-)
Kolekcja Golden Coast, będąca podstawą czerwcowego kitu Limited Edition od My Creative Scrapbook, zawiera głównie morsko-plażowe motywy, ale znajdzie się również sporo motywów po prostu letnich :-) Kiedy na arkuszu naklejek kartonowych zobaczyłam lody, od razu wiedziałam, które zdjęcie znajdzie oprawę :-) Prawdziwa włoska lodziarnia, Florencja:
The Golden Coast collection that makes the basis of the June Limited Edition kit from My Creative Scrapbook contains mainly sea-beach motives, but there are also quite a few just-summer motives :-) And when I spotted ice cream cardstock stickers, I instantly knew which photo gets scrapbooked :-) A genuine Italian ice cream parlor, Florence:
Ponieważ to jedyny ciemny arkusz w kolekcji, mogłam tytuł przykleić bezpośrednio na tle, i embossować na biało odbite stemplem słowa. Do tego wzór z maski naniesiony złotą pastą i kilka jasnych dodatków, dzięki którym zdjęcie nie zlewa się z tłem. I tym razem NIE użyłam kwiatów! :-DD
As this was the only darker sheet in the set I could apply the title letters directly onto the background and emboss stamped words with white ep. I also added a stencil pattern with golden paste and a couple of light paper pieces and embellishments that make the photo stand out from the background. And I also did NOT use any flowers! :-DD
I to już ostatni layout, ale bynajmniej nie koniec projektów! Zapraszam jutro :-)
Miłego ostatniego dnia szkoły!
And that was the last layout of the series, but not the end of projects! Drop by tomorrow!
And have a nice last day of the school year!
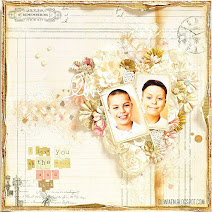
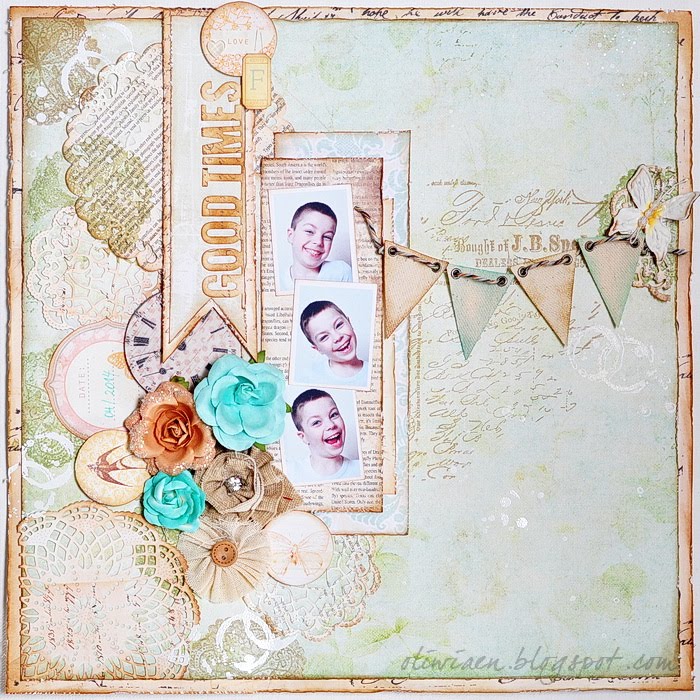
Pora na trzeci layout z czerwcowego kitu Limited Edition od My Creative Scrapbook, z kolekcją Golden Coast Primy i dodatkami American Crafts:
Time to share the third layout I made using the June Limited Edition kit from My Creative Scrapbook, featuring the Golden Coast collection by Prima and American Crafts embellishments:
Nietypowa, pastelowa kolorystyka kolekcji, z wyraźną nutą różu i złota, uwydatniła kolorystykę zdjęcia, którego "wodne" tło idealnie podkreśliło litery tytułu, naklejone bezpośrednio na nim. Dodałam też wzór z maski i złotej pasty:
The unusual pastel colour palette of the collection, with distinct pink and gold, was a perfect match for the photo colour combo, with its "water" background that made the title letters pop out. I also added a stencil pattern with gold paste:
Zapraszam jutro na ostatni layout tej serii :-)
Come back tomorrow for the last layout of this series :-)
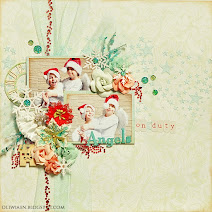
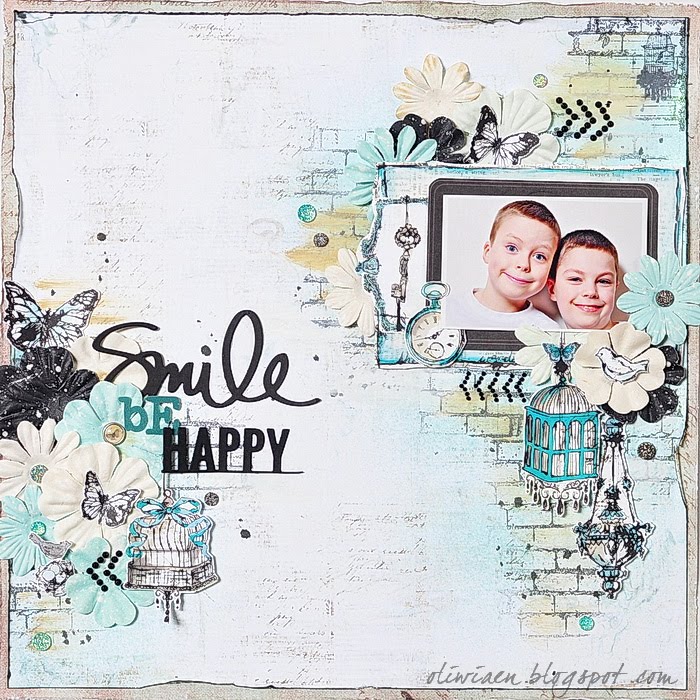
Dzisiaj przedstawiam drugi layout, jaki powstał z czerwcowego kitu Limited Edition od My Creative Scrapbook, z kolekcją Golden Coast od Primy oraz maskami, brokatowym alfabetem i stemplami American Crafts:
Today I'm sharing the second layout I made with the June Limited Edition kit from My Creative Scrapbook, featuring the Golden Coast collection by Prima and stencils, glitter alpha stickers and stamps by American Crafts:
Na warstwy papieru w tle nałożyłam wzór z maski i uwydatniłam go kolorowymi mgiełkami, a następnie ułożyłam wokół zdjęcia kompozycję z kwiatów, die-cutów i tekturowych naklejek. Ponieważ papiery są w jasnej kolorystyce, a literki alfabetu białe, tytuł ułożyłam bezpośrednio na zdjęciu, by był widoczny:
I layered papers in the background and added a stencil pattern, then made it pop out with colourful mists. Then I decorated the photo with flowers, die-cuts and cardstock stickers. As the papers in this collection are quite light and the alpha stickers are white, I arranged the title directly onto the photo to make the letters visible:
Zapraszam jutro na kolejny layout :-)
Miłego dnia!
Visit me tomorrow to see the next layout :-)
Have a nice day!